
Whether you put it in the salad, ball it up nicely inside the sushi or commit yourself every time to recipes or platings that you would win Master Chef with your eyes closed, everyone ends up with two things in the end: a full belly and a large and curious seed.
For the belly there is little that can be done, but for the seed it is a completely different story!
Avocado challenge
Have you heard of this challenge? Are you already itching to try it? Or is this the first time you’ve heard of it? Either way, this article will take you on an exciting journey: we want to give avocado pits a new lease on life instead of throwing them in the trash, and witness their growth step by step!
First, let’s learn the basics: the core of the avocado challenge is to germinate an avocado pit in a glass of water. All you need is an avocado pit (did you guess that?) and a glass of water.

Prepare the seed for ideal germination
The seed can be either naked, i.e. without the external integument (a sort of darker skin than the seed itself) or provided with a covering. There are not many differences between the two options, but a naked seed will germinate slightly faster.
How to remove the integument correctly?
- Wrap the damp avocado seed in a handkerchief or kitchen paper;
- Leave it to dry well in the sun;
- Remove the dried film which will come off easily.
After completing the above steps, you need to prepare to soak the seeds. The seeds should not float in the water; instead, they should be secured with pins (or toothpicks, but toothpicks should not be too wet, otherwise they may break). This creates a support structure to hold the seed in the correct position.
If the seed splits open after inserting the support, don’t worry, this is normal! The embryo is usually located within one half of the two halves. Even if the two halves remain separate, it’s okay.
Another tip to speed up germination: remove the bottom of the seed (the firmer, flatter part compared to the tip). If you’re daring enough, you can even remove the entire seed, leaving only the embryo. But be very careful: you need to know exactly where and how to cut! If you’re unsure, it’s best to proceed with caution.
Directions on the water
The objective of this challenge is to germinate the Avocado in water, but be careful, it is not a simple cutting for which the level of immersion can be – always with some care – random, in fact it is necessary to pay close attention to how and in how much water we leave our dear Avocado seed to “soak”.
In particular, the water level differs depending on two macro periods of the life of the seed:
- Before germination: we are in the early stages, here the seed must be submerged for about 2/3 of the lower part, leaving only the upper head out;
- From germination onwards: the seed has opened and we now see the radicle protruding, at this point the water level must be lowered, almost touching the bottom of the seed which however it does not touch, in fact it would be useless, at this point, to make it wet.
Another important aspect is the cleanliness of the water, it is in fact very important to avoid it becoming numb or creating slime, by changing it a couple of times a week it should remain clear and optimal for the growth of our Avocado.
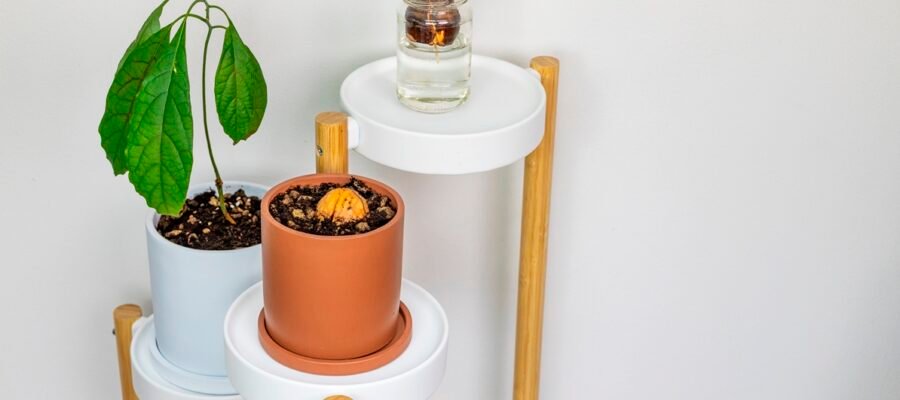
From seed in water to seed in pot
Here we are now at one of the crucial points of our article: how and when to move from the seed germinated in water to the soil? It is undoubtedly a delicate step but the good rule, which may seem a little absurd, is: immediately or never. Anachronistic right? Yet that is precisely the line to follow, but let’s explain better!
In nature the Avocado seed does not germinate in water, for us it is a curious and interesting experiment, which allows us to follow all the stages of the growth of our Avocado seed, but since it is not usual for it we must take into account some complications that can arise due to this variant. In fact, in nature the plant grows, generates the fruit, which falls and decomposes, leaving the seed which will then germinate by putting its roots directly into the ground.
Even our seed could easily germinate in contact with the ground, but it would require temperatures that cannot be found outdoors in Italy throughout the year (around 22°C). also let’s face it, how beautiful is it to see the seed develop in water? In addition to a scientific interest there is a significant aesthetic value.
But let’s go back to our “now or never”. Our seed germinated in water, what to do?
- Never: the roots are well developed, tapered and long, accustomed to water. Now continue to grow the seed in water, it will never become a plant but it will be able to live peacefully. The paths divide here too, it is in fact possible to continue in complete hydroponics (therefore alone in water) or in semi-hydroponics (adding expanded clay inside the vase).
- Immediately: the Avocado root is just mentioned, or in any case has not yet branched, and it is exactly the right time to move it into the ground without causing too much stress to the plant.
If desired, it is possible to try to put the plant in the ground at any time but it must be taken into account that the more developed the root system is, the greater the risk that the operation will not be successful, also risking killing the Avocado.
Does the seed then remain in the water?
This is a very curious thing, in fact you will notice that as time passes the seed will almost disappear. This happens because the purpose of the seed is to provide energy until the embryo it contains develops a very complex and complete root system. At that point all the nutrients were in the two cotyledons (the two parts of the seed), they were used by the plant, so at a certain point the seed ended up withering and then detaching from the plant itself.
Germination times
Here’s another question we get asked when talking about the #AvocadoChallenge: how long does it take for the seed to germinate in water?
As much as we wish we could, there is no fixed answer. Sometimes it can even take 2 to 5 months. By cutting the lower part of the seed, as we were saying, the times are speeded up a little but we cannot always expect miracles, however sometimes we could see our seeds leave even after 3 weeks or 20 days.
Sowing the Avocado seed
Drumroll and hype skyrocketing, the great moment has come, it’s time to plant our seed!
As? Don’t know how to do it? No problem, we are here for this too
Let’s start with the things we will need:
- Soil: choose a good one, we recommend our Florenpot, a peat-based soil that has pumice inside, which makes it very draining (do you want to know more about soils? Here is an article not to be missed!);
- A vase: here you can easily follow your taste, but be careful that the chosen vase has a cultivation hole, in this way the draining properties of the soil will not be wasted.
That’s it, nothing special. Just two things and we are ready to act!
If you look inside the crack created for the root to come out you will be able to see the green shoot which will then form the stem of the plant, this tells us that it is a part that absolutely should not be buried. The soil level, in fact, must start from the root onwards and absolutely not before. Between the root and the bud in progress there is the famous collar which must never be buried, being the point of conjunction between the epigeal part (outside the ground) and the hypogeal part (the root system).
Let’s now proceed with the planting:
- We moisten the earth by spraying it,
- We ideally place the seed inside the pot;
- We proceed to fill with earth (without exaggerating! Never reach the edge);
- We fill the vase being careful not to break the delicate root;
- We check that the seed is inside in an optimal way and if so we arrange the soil well;
- Remove the pins or toothpicks previously used;
- Wet the soil evenly without soaking it, it is necessary that the roots remain moist but excesses must be avoided to avoid rotting.
If the plant we want to plant has grown a little and no longer has a seed, we will find ourselves dealing with an oversized root system. In this case it is possible to reduce the length of the roots by cutting off the last part. It is not an ideal practice and would be best avoided (also because it involves quite a bit of risk), but if the roots are excessively developed it is worth giving it a try. For the rest, we also identify the collar here, position the plant well and add our trusted soil. If you have done a good job the Avocado will stand up on its own, otherwise place a support alongside it to help it. We wet the soil and that’s it!
How to take care of Avocado
Perfect, we made it grow, cared for and protected it from the moment it left its fruit, but now it has become big and strong, there in that jar. But abandon the empty nest crisis, he still needs care!
Exposure
Avocado loves light, during the hot months no direct sun rays, but in winter you can easily let it absorb some solar heat.
Temperature
Its ideal temperatures are those of apartments and vary from 20 to 25°C, while it is absolutely not recommended to go below 10°C.